Shooting 360 Degree Spins at a Macro Level for Timestrip
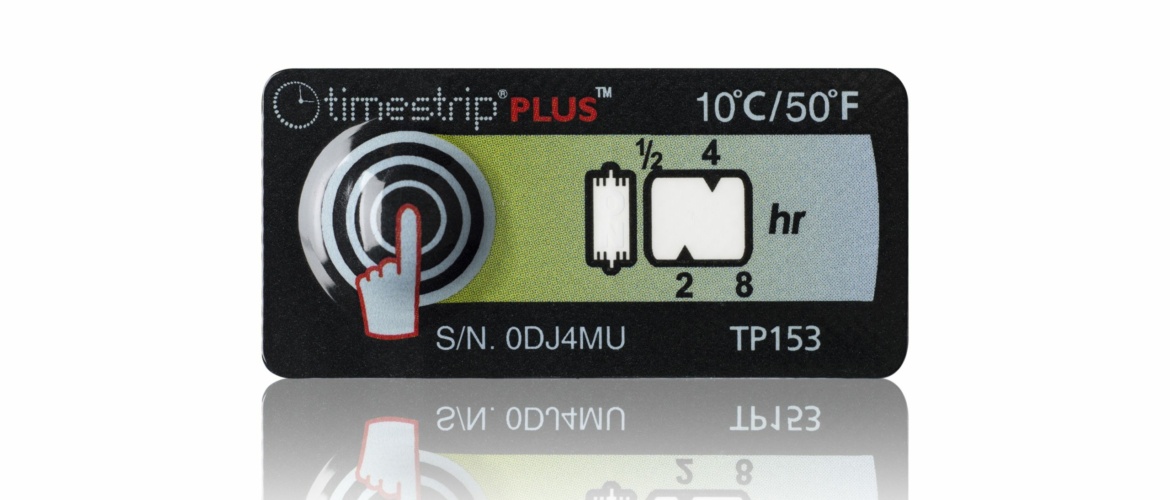
We were recently tasked with shooting some 360 degree spin product photography. It takes time and care, but the results speak for themselves if you get the science right. On this occasion there would be a little more science than usual. These weren’t our typical 360 spins of shoes, handbags or plastic models, but tiny, medically essential devices produced by Timestrip. Timestrip products are small electronic patches which can be applied to surfaces to measure temperature levels over determined time periods, even indicating where programmed limits have been exceeded and for how long. Their applications are widespread but include transportation and storage of foodstuffs and crucially, blood. These tiny wonders monitor temperature compliance of blood bags, especially relevant during transit from the highly controlled environment of the blood bank to the hospital, laboratory or other recipient location. They are an integral part of a potentially lifesaving chain so we’d say they definitely deserve the 360 treatment!
We’ve covered the basics of 360 spin technique in an earlier blog so give that a read to understand the importance of the degree markings, tripod, spirit level etc. but Timestrip’s challenges were presented to us on a different level. Such tiny products required getting in close with a macro lens. Shooting on white perspex for the glossy, reflective look, the material’s natural affinity for dust attraction was more pronounced than ever. A few specks of white are more likely to go unnoticed when dwarfed in the frame by a stylish pair of boots, but next to these miniature subjects, dust flecks look like dancing snow on the turntable and fluff like tumble-weed signalling disaster. With 72 frames to shoot for a full revolution, it’s pretty essential the positioning of the subject remains consistent as it spins on its axis, so vigorous surface wiping is out. Instead, clean your working area thoroughly and use isopropyl alcohol with anti-static cloths to prepare the perspex as best you can pre-shoot. Running a hoover nozzle close to your subject may eliminate some floating dust but will probably drive you crazy after a while so that one’s up to you. Silly 50’s sci-fi-sounding name aside, the Milty Zerostat 3 gun uses streams of positive and negative ions to release the static charge of objects you point it at. Immediately after use, a charged brush or air-blower will be much more successful at collecting dust away from the perspex…. and you can use the Zerostat on your vinyl collection!
As ever, a toss-up between time spent while shooting and time spent retouching will dictate the level of OCD-ness you apply to the cleaning process but we like to be pretty spic and span – additionally, with such a large amount of images per product, budget issues generally dictate that batch processing and occasional retouching are favourable for clients over individually retouched shots. That puts the onus on us to get as close as we can in-camera. Surfaces must be clean and whites need to be WHITE (or as close to it as possible) as we will not be cutting out the product in each frame. Reflections are also crucial. Our proximity to the subject means the chance of catching a semblance of the camera increases (masking it under a white cloth can help) and the curved surfaces of some of the products meant we had to pay close attention to our immediate environment to ensure unwanted distractions weren’t being reflected. As ever, large, diffused, evenly distributed light sources were key in creating the type of illumination we needed and in part the reflected highlights which gave the products tangible form.
Shooting 360 spins at a macro level definitely presents new challenges and this job underscored that compromise and adaptability are often essential. The level of retouching that professional pride calls for on one product image can’t be applied to each frame of a huge composite under normal budget conditions so extra care and attention have to be applied at the shooting stage to get the best overall result. When working within constraints, always think about your workflow and assess where you can squeeze the most bang for your buck in the time you have.
Thanks for reading.
